Thursday, June 24, 2010

Back

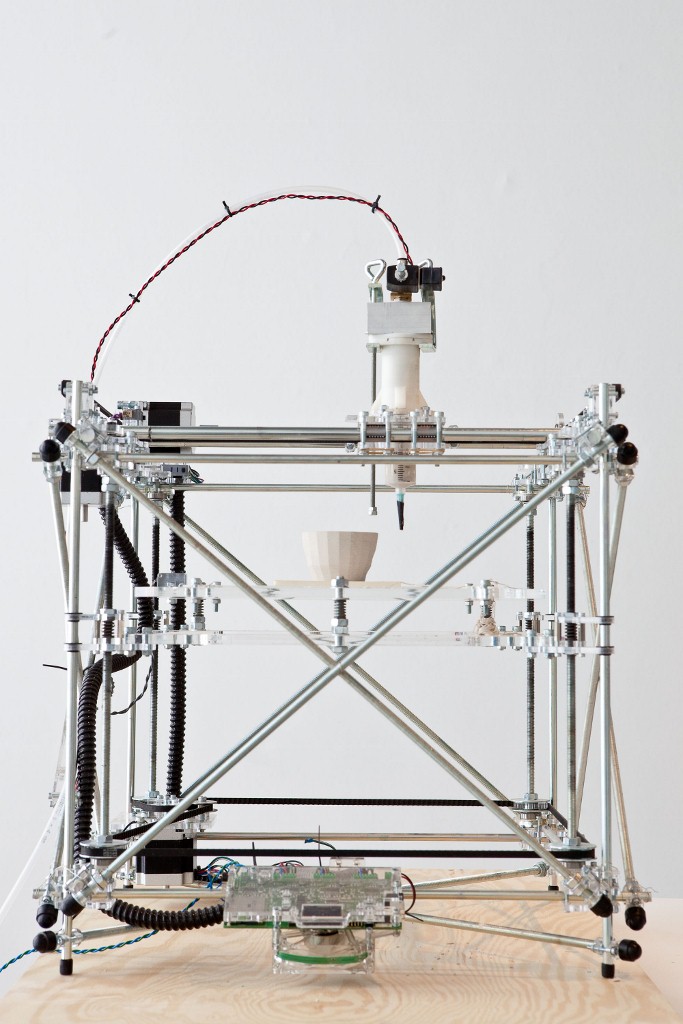
Our machine is finally back in the studio for a longer time so expect some updates. First experiences with glass for example. Stay tuned.
Last week we gave a talk and demo in Basel at Hyperwerk. Hyperwerk is an institute for post-industrial design (love that title) and feels like a large fablab/hackerspace but one where you can get a bachelor degree :)
They will start using a Frostruder and Makerbot for printing all kinds of material including ceramics. Besides a Makerbot they have a Mendel, ShaperCube and immediately ordered a RapMan after seeing ours. I am looking forward to their results!

Hyperwerk chief Mischa looking at a CNC styrofoam cutter

Thursday, May 13, 2010

One exhibition, two repraps, lots of other great projects.

It has been quiet for a while, not because we weren't working but the opposite :) So expect a few posts in the coming days.

What was taking our time? Art centre Z33 in Hasselt, Belgium commissioned Unfold to create an installation 'featuring a 3d printer' for the exhibition "Design by Performance". The Installation is called L'Artisan Electronique and combines traditional pottery craft with 21th century digital techniques. Its still on display till the end of May. If you happen to be in the neighborhood, we will be operating the printer the 29th of may.

From the catalogue:
The world of design has been witness to how the boundaries between art and experimental design are becoming ever more blurred. The exhibition ‘Design by Performance’ is a showcase for performative trends in contemporary design, which focuses not on the production of a finished product, but on the production process itself: objects whose realisation is a continuous project, affected or formed by either the environment, the specific situation in which they find themselves, or onlookersAs such, processes and performances constitute a crucial part of Design by Performance, thus lending the exhibition its unpredictable and spontaneous character, and converting what is otherwise a pure ‘exhibition space’ into a space for events, interventions and actions by designers, artists and the public.

Participants
Atelier NL (NL), Maarten Baas (NL), Pieke Bergmans (NL), David Bowen (USA), Oscar Diaz (UK), Edhv (NL), Front (Sw), Martino Gamper (UK), Simon Heijdens (UK/NL), Eric Klarenbeek (NL), Sofie Lachaert & Luc d’Hanis (B), Laurent Liefooghe (B), Lawrence Malstaf (B), Bruno Munari (IT), Markus Schinwald (Au), Studio Glithero (UK), Studio Libertiny (NL), Tjep. (NL), Unfold & Tim Knapen (NL/B)

For L’Artisan Electronique, Unfold created - aside from the ceramic printer you all know - a virtual pottery wheel in collaboration with Tim Knapen. This pottery wheel gives visitors a chance to ‘turn’ their own forms. At regular intervals, a selection of these designs is printed in clay and exhibited in the space.
In L’Artisan Electronique, pottery, one of the oldest artisanal techniques for making utilitarian objects, is combined with new digital techniques. The virtual pottery wheel was realsied by means of a 3D-scanner and digital design software. However, the installation still clearly refers to the artisanal process of working in clay. The printing process imitates the traditional technique used by ceramicists, in which the form is built up by stacking coils of clay.


The other Reprap on display is in David Bowen's Growth Modeling Device that has been featured on a few Reprap blogs in the past. Its a fantastic piece that copies a growing union plant at regular intervals. David, who together with his wife also happen to be wonderful people, build his own Darwin style printer using a Makerbot extruder and gen2 electronics. The fun thing is that the printer has no top frame and is still very stable. I think he did a better job at integrating the Reprap technology in his installation than us, we didn't try :) More info at http://www.dwbowen.com/gmd.html


Friday, February 19, 2010

Hello Blogosphere

This blog was originally intended to share our progress with fellow reprappers in modifying a 1000$ Rapman to print clay. But this post was picked up by BoinBoing two days ago and spread to Wired, Makemagazine, Openmaterials, Switched and Open3dp. You've got to love the internet, yeah! We got lots of great responses, questions and emails. For the new visitors that missed the previous discussions in the Reprap forum here and here and some other places we decided to write a follow up on some of the comments and to clarify some things:

-Unfold Fab is a blog by spatial design studio Unfold, check our website to get an impression of what we do.

-We use a Rapman from Bits from Bytes which is an everything-in-on-kit version of the open source RepRap project. Highly recommended machine!

-We will present our research as part of the Designed by Performance show at Z33, Hasselt, Belgium. The installation L'Artisan Electronique will feature a Rapman with Claystruder and a virtual trowing wheel that scans 3d hand movements and generates virtual objects that will be printed at a later time. The installation is a collaboration with Tim Knapen. David Bowen will also show his Growth Modelling Device, a Reprap based installation. More on this show soon.

-Is this the first use of rapid prototyping/manufacturing technology in ceramics? No, definitely not and some bloggers understood the posts title as if this was the first printed ceramic vessel EVER in the history of mankind.... Ceramics has been made before using expensive rapid prototyping machines, there is the work of Marc Ganter's team from U of Washington and John Balistreri from BGSU. Both use Zcorp printers with modified binders and clay powders. Then there is Robocasting which uses a very similar technique to what we are doing: clay extrusion. Also the work done on large scale concrete printers has lots of overlap like Contour Crafting developed by Behrokh Khoshnevis or the concrete printer used by artist Ansih Kapoor made by Factum Arte. There was a post in the pipeline explaining why we are doing extrusion and how it compares to the powder/binder based process, we'll post that in a few days. But as far as I know this the first ceramic vessel done on a sub 1000$ rapid prototyper! :) I think Switched.com got it right as to the importance of this affordable hackable technology being in the hands of designers:
With reasonably priced 3-D printers hitting the market, and DIY versions becoming more prevalent, we're now entering a very exciting time in which designers are experimenting with the materials they send through their extruders. We wrote back in November about Belgian design outfit Unfold and the Utanalog teapot it displayed at the Bits 'n Pieces Exhibition. Now, Unfold has successfully used its 3-D printer to print an earthen vessel from powdered ceramic material.
-Its not powdered ceramic material as in the Zcorp process. Clay is a suspension of minerals in water and the Zcorp based system kind of makes clay in the print process by adding the binder. We use clay as a print material and we use clay powder just to make clay that always has the same consistency. Sounds high tech to some but this is standard pottery techniques.

-Someone pointed out that it is technically not ceramics until it is fired and he/she was absolutely right but this is corrected as per the previous post ;)

-Can this be smoothed? Sure, dry greenware objects are very easy to sand or you can smooth them when still wet, many options and we'll do some tests on the next prints. We like the traces of 'making' on objects and thats why we left them rough.

Successfully fired

We bisque fired everything at 1000°C and all tests came out of the kiln perfectly which is very encouraging. Air doesn't seem to be to much of a worry. Yes, those are Utah teapots :)


Sunday, February 14, 2010

The future's here baby! (first successfully printed ceramic vessel)

We took some time to play around and get used to the dynamics of the clay print process. It was also time to step up (or down?) the resolution from 1.9 to 0.8 mm using screw-on luer lock tips. We are also now using powder clay that can be mixed in exact quantities instead of moisturizing chunks of clay. Also figuring out ways of reliably filling the syringes without trapped air. I'm using a similar 60cc syringe where the front is cut off and use this to suck in the clay from the mixing bowl. Then the clay is transferred to the print syringe, this works really well actually.

After some calibrating I decided to print a test design that would be hard to make using conventional techniques: a double walled vessel with fins connecting in- and outside. I was expecting mostly failure but it finished without to much trouble! Due to the restrictions of Skeinforge expecting 3d models, the walls are double filament (1.5mm total). As you can see on the Pleasant3d view there is an outer and inner shell and instead of a line connecting both there are o-loops. Testing a different design now that enables us to test a single filament double wall vessel. But in the end We will need a way to generate tool paths from single walled surfaces instead of solids

Last weekend I talked briefly with Adrian Bowyer after his excellent talk at FOSDEM. I was excited to show him our results after he finished his talk with mentioning ceramics as future possibilities (hence the title, wink, wink)

Now lets pray all together that trapped air bubbles won't make it pop...


More images and video in our gallery [note 04-2015: gallery is gone)

ps. Sorry Erik for the missing reference, its 70 x 70 mm


Thursday, January 14, 2010

Hello slurry World!

Here they are, the first extrusion tests with white baking throwing clay. All in all I am pretty happy with the initial results and the design ideas for rapid prototyped clay products start flowing too :)

The first set shows some prints with a Gcode file that turns the extruder's solenoid on and off for each layer. The benefit of the pressurized extruder should be instant on/off but apparently I have to tune some parameters to get to that. Off was very instant but repressurizing took considerable time. In this example you can see various pressure settings (3,5-5 bar) and as a result the extrusion gets thicker and the restart is quicker. The clay is probably a bit to thick, it didn't work at all straight from the pack so I mixed it with some water by hand. So maybe when it is more fluid, use a smaller orifice (add short a blunt needle), run quicker and higher pressure I could get instant restarts? I am also going to try not to depressurize the syringe by closing the exhaust. I hope that when I can keep some pressure that it will be easier to find a balance.


For the next tests I just removed all the start/stop code for the solenoid in between layers and got pretty good results, I should increase the Z speed to get thinner blobs when going to the next layer. The slightly thicker squashed extrusion (back left) gives much more reliable builds.


Here you see some 'solid' object, this are various stages of a cube with sparse infill and two solid layers  aborted somewhere in the print. The solid layers need some adjusting and I really should learn how to calibrate my machine, something I always run around. For all this tests I just set the layer height in Skeinforge to 1.4 mm and left the rest as is (except the amount of perimeters, infill ratio etc). In the bottom left example you see what happens if you run out of clay... A little air blast. At ths stage I got really enthusiastic about the possibilities for this mashup of old craft and new tech. This types of structures are very hard to do in traditional ceramics and we have some initial ideas with this.


Some less successful examples ;)


Lessons learned and questions unanswered so far:

  • While initially enthusiastic about Zach Hoeken's pressurized syringe tool I am after two days a bit skeptic about how controllable this process is. I had to remove as much distance as possible between compressor and extruder to prevent pressure build up in the tubes. I will try soon with a separate pressure controller that I can mount close to the extruder and that is much more precise than the system build in the compressor. But what worries me more is that the flowrate is dependent on the pressure AND the mixture of the clay and so far it is hard to get that very consistent true different batches. Its a nice test bed but I think I will need to build a stepper driven tool to compare.
  • We-Need-Software... And we plan working on it. Skeinforge is not very useful when you want to build single filament wall objects and when you really want all the control you can get over infill structures etc. For us this is not so much about reconstructing 3d object but about using the very form language of FDM but in different materials. What we want is a tool in which you can draw gcode lines. At the moment we are looking at a Gcode import/export plugin for Illustrator using Scriptographer. Yes, AI is not 'free' but it is what we know best. But we'll trow the plugin out for anyone to use.
  • Rapman is definitely not intended for wet slurries, the design is very open. An air bubble can trow around some mud and dry clay gives lots of dust. Will need to look at a system to cover some parts ore have a closed build area. Thinking about a paper/plastic bellow around the build area.
  • Object stay flexible true the build and hours after so one rapid move from the extruder can deform parts of your object.
  • No idea why objects taper, shrinkage?


Monday, January 11, 2010

Claystruder mounted, ready to test


So I'm moving along with my paste extruder, tomorrow I will do the first wet clay test with the extruder mounted on my Rapman. Today I did a dry test only with pressurized air to see if I could coble together some Gcode to switch the AUX port of my Rapman electronics. My original filament extruder is still connected to the board so I set the temp in Gcode at 100 degrees, RPM at 0 and replaced all extruder start/stops by AUX start/stops. That did work, setting the temp at 0 did not work because rapman would move to the center and do nothing. Removing all set temp and RPM code resulted in random movements. I'll have to test some more on this quick 'n dirty solution. I am looking for a method to skip the whole heat-up phase all together, remove my original filament extruder and use only the AUX. The Rapman firmware is already setup to work with different (future) extruders like a pen tool and a router. You can set a different ID for the extruder with different resistors:

Tool Header
The RapMan identifies the type of tool fitted by checking the voltage dropped across a reference resistor, values as follows:
Description Resistor A/D
976 Ohm resistor for PEN 1K (90)
4.7K Ohm resistor for Extruder 4K7 (320)
9.9K Ohm resistor for Extruder2 10K (500)
22K Ohm resistor for Not Defined 22K (700)
47K to 100K Ohm resistor for Router 47K to 100K (840 to 920)
1M Ohm resistor for No Tool 1M to open circuit(1010 to 1024)

At Ver1.0.5 the Extruder, Pen and Router have been defined in firmware.

Pen and Router would probably be interesting for me but there is not much more info on what they do, I'll  have to test that out and ask around. Then I will need to find a way to make Skeinforge output usable code for this extruder. At the moment I use hand tuned code with a single filament wall. Lets see tomorrow how the code and the clay behaves!